

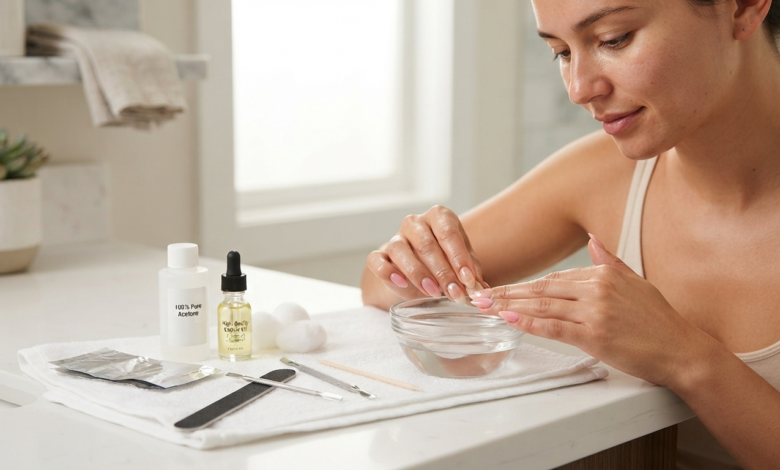
Acrylic nails are a popular way to create longer, stronger, and more polished-looking nails. They can look beautiful for weeks, but eventually, you may want to remove them because they have grown out, become loose, or you simply want a break from artificial nails.
If you are wondering how to remove acrylic nails at home, the key is to be patient and avoid pulling them off. Removing acrylic by force can damage the natural nail underneath, making it thin, weak, or painful.
Fortunately, you can perform basic acrylic nail removal at home using a few simple supplies and the right technique. This guide explains the safest general method, what you need, common mistakes to avoid, and how to care for your natural nails afterward.
Can You Remove Acrylic Nails At Home?
Yes, acrylic nails can generally be removed at home, but the process takes time. Acrylic is designed to adhere firmly to the natural nail, so trying to peel or rip it off can remove layers of the natural nail.
The most common home method uses acetone to soften the acrylic before gently removing it. Filing can also help reduce the thickness of the acrylic and make the removal process more manageable.
If your nails are damaged, infected, extremely painful, or the acrylic is causing a significant problem, professional removal is a better choice.
What You Need for Acrylic Nail Removal
Before learning how to remove acrylic nails at home, gather your supplies.
| Item | Purpose |
|---|---|
| Nail clipper | Shortens long acrylic nails |
| Nail file | Removes the top acrylic layer |
| Acetone | Softens acrylic |
| Cotton balls or pads | Holds acetone against nails |
| Aluminum foil | Wraps the nails |
| Orange stick | Helps loosen softened acrylic |
| Nail buffer | Smooths the nail surface |
| Cuticle oil | Helps moisturize nails and cuticles |
| Hand cream | Provides moisture after removal |
Use acetone in a well-ventilated area and keep it away from flames or heat sources.

How To Remove Acrylic Nails At Home
The following method is commonly used for home acrylic nail removal. Take your time rather than trying to finish quickly.
Step 1: Trim the Acrylic Nails
Start by cutting down the length of the acrylic nails with a nail clipper.
Do not cut deeply into the natural nail. Only shorten the artificial portion as much as comfortably possible.
Shorter acrylic nails are easier to soak and remove because there is less material to dissolve.
Step 2: File Off the Top Layer
Use a coarse nail file to gently remove the shiny top coat and some of the acrylic thickness.
You do not need to file all the way down to your natural nail. The goal is simply to reduce the amount of product that the acetone needs to soften.
Work slowly and stop if you feel heat, pain, or discomfort.
Step 3: Protect the Skin Around Your Nails
Acetone can dry out the skin. Applying a small amount of petroleum jelly or a thick moisturizer around the cuticles and surrounding skin can provide some protection.
Try to keep the product off the acrylic itself because you want the acetone to work effectively on the artificial nail.
Step 4: Soak Cotton in Acetone
Pour enough acetone into a small container or use acetone to thoroughly soak cotton balls or pads.
For a foil method, place a soaked piece of cotton directly over each nail.
Make sure the cotton covers the acrylic as much as possible.
Step 5: Wrap Each Nail
Wrap each fingertip with a small piece of aluminum foil to hold the acetone-soaked cotton securely against the nail.
The wrap should be comfortable rather than extremely tight.
Repeat this process for all acrylic nails.
Step 6: Wait for the Acrylic to Soften
Allow the nails to soak for around 20–30 minutes, then check one nail.
The exact time can vary depending on the thickness and type of acrylic product.
If the acrylic is still hard, rewrap the nail and allow it more time. Do not immediately start pulling at the artificial nail.
Step 7: Gently Remove the Softened Acrylic
Once the acrylic has softened, carefully remove the foil and cotton.
Use an orange stick or another appropriate manicure tool to gently push away the softened acrylic.
The material should come away relatively easily.
If you have to use significant force, stop and soak the nail again.
Step 8: Repeat If Necessary
Thick acrylic may not come off completely after one soak.
If some material remains firmly attached, soak the nails again rather than scraping aggressively.
This is one of the most important steps when learning how to remove acrylic nails at home because patience helps reduce unnecessary damage to your natural nails.
Step 9: Smooth the Natural Nails
After the acrylic has been removed, gently buff any remaining residue.
Do not aggressively file the surface of your natural nail. Your natural nails may feel thinner or more sensitive after acrylic removal, so gentle treatment is important.
Step 10: Moisturize Your Nails
Wash your hands and apply cuticle oil followed by a moisturizing hand cream.
Acetone can leave the skin and nails feeling dry, so moisturizing is an important final step.
How Long Does Acrylic Nail Removal Take?
Acrylic nail removal at home can take approximately 30–60 minutes, depending on the thickness of the acrylic, the removal method, and how well the product responds to acetone.
Do not rush the process. Spending extra time soaking is generally preferable to forcing the acrylic off.
| Stage | Approximate Time |
|---|---|
| Trimming | 5 minutes |
| Filing | 5–10 minutes |
| First acetone soak | 20–30 minutes |
| Additional soaking | 10–20 minutes |
| Cleaning and moisturizing | 5 minutes |
The times are estimates and can vary between different acrylic systems.
What Not To Do When Removing Acrylic Nails
Knowing what to avoid is just as important as knowing how to remove acrylic nails at home.
Do Not Peel the Acrylic Off
Peeling can remove layers from the natural nail plate. Even if an acrylic nail appears loose, avoid ripping it away.
Do Not Force the Acrylic With a Tool
If the product does not move easily, it probably needs more soaking. Scraping forcefully can damage the natural nail.
Do Not Over-File Your Natural Nails
Filing too deeply can make the nail surface thin and sensitive. Only remove artificial product.
Do Not Use Excessive Heat
Some people try to speed up acetone removal by using very hot water or direct heat. This is unnecessary and can create safety risks.
Do Not Use Open Flames Near Acetone
Acetone is highly flammable. Keep it away from cigarettes, candles, stoves, heaters, and other ignition sources.
Acetone vs. Filing for Acrylic Nail Removal
Both soaking and filing can play a role in acrylic nail removal, but they work differently.
| Method | Advantages | Disadvantages |
|---|---|---|
| Acetone soaking | Softens acrylic effectively | Can dry skin |
| Filing | Reduces acrylic thickness | Can damage natural nails if overdone |
| Combination | Often more efficient | Requires patience and care |
For many people, lightly filing the surface first and then using acetone is a practical approach.
How To Care for Your Nails After Acrylic Removal
Once you take off acrylic nails, your natural nails may need some extra care.
Apply Cuticle Oil
Cuticle oil can help keep the skin around the nails moisturized.
Use Hand Cream
Apply a nourishing hand cream regularly, especially after washing your hands.
Keep Nails Short
If your nails feel weak after removal, keeping them shorter can reduce breakage.
Avoid Immediate Reapplication
Consider giving your nails some time before applying another acrylic set, particularly if they feel thin or sensitive.
Avoid Picking
Do not pick at remaining residue or peeling nail layers. Allow the natural nail to grow and recover.
Signs You Should Stop Home Removal
Home acrylic nail removal should not cause significant pain.
Stop if you experience:
- Severe pain
- Bleeding
- Significant swelling
- Burning that does not improve
- Major nail discoloration
- Pus or unusual discharge
- A natural nail that has lifted significantly
If you notice signs of infection or serious nail damage, seek advice from a healthcare professional.
Common Mistakes During Acrylic Removal
Trying to Finish Too Quickly
One of the biggest mistakes is rushing the soaking process. Acrylic often needs time to soften.
Using Too Much Force
If the acrylic does not move easily, more soaking is usually preferable to forceful scraping.
Skipping the Filing Step
Removing some of the top acrylic layer can make the soaking process more efficient.
Forgetting Aftercare
Nail care should not end when the acrylic comes off. Moisturizing and protecting the natural nails are also important.
Tips for Easier Acrylic Nail Removal
If you want the process to be easier, follow these simple tips:
- Work in a well-ventilated room.
- Trim the acrylic before soaking.
- File away the shiny top layer.
- Keep the cotton saturated with acetone.
- Wrap the nails securely but comfortably.
- Be patient during soaking.
- Never force stubborn acrylic.
- Moisturize your hands and cuticles afterward.
These steps can make how to remove acrylic nails at home a much safer and more manageable process.
Frequently Asked Questions
What is the easiest way to remove acrylic nails at home?
The most common home method is to shorten and file the acrylic, then soak it with acetone until it becomes soft enough to remove gently.
Can I remove acrylic nails without acetone?
It is possible to file away acrylic, but doing so requires care because excessive filing can damage the natural nail. Acetone is commonly used because it helps soften acrylic.
How long should I soak acrylic nails in acetone?
A common starting point is around 20–30 minutes. Thicker acrylic may require additional soaking. Avoid forcing the product off if it remains hard.
Can I peel off my acrylic nails?
No. Peeling or ripping acrylic off can remove layers of the natural nail and cause unnecessary damage.
Can I use nail polish remover instead of acetone?
Regular nail polish remover may not work effectively on acrylic because many formulas contain less acetone or none at all. Pure acetone is commonly used for acrylic removal.
Why are my nails weak after acrylic removal?
Your natural nails may feel weak or sensitive after acrylic removal, particularly if the surface was over-filed or the acrylic was pulled off. Gentle care and moisturizing can help protect them while they grow.
How often can I get acrylic nails?
There is no single schedule that works for everyone. If your natural nails become thin, painful, or damaged, consider taking a break and allowing them to recover.
Should I remove acrylic nails professionally?
Professional removal is a good option if the acrylic is difficult to remove, your nails are damaged, or you are uncomfortable using acetone and manicure tools at home.
Conclusion
Learning how to remove acrylic nails at home does not have to be complicated, but it does require patience. The safest general approach is to trim the artificial nails, reduce their thickness with careful filing, soak them in acetone, and gently remove the softened product.
The most important rule is to never peel, rip, or force acrylic from your natural nails. Taking extra time to soften the product can help reduce unnecessary damage.
After you take off acrylic nails, focus on simple aftercare. Keep your nails moisturized, use cuticle oil, avoid aggressive filing, and give your natural nails gentle treatment. If you experience significant pain, bleeding, swelling, or signs of infection, stop the process and seek professional advice.
With the right technique and a little patience, you can make acrylic nail removal at home a much easier and more nail-friendly process.